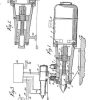
E93839 Motherboard Schematic Updated
Output capacitors/inductors surrounding the CPU socket.
In this post, we are taking a closer look at the E93839 motherboard, why schematic updates matter, and what you need to know about this recent release.
: If the 12V CPU power rail shorts directly to the ground, the power supply will trip instantly upon turning on. e93839 motherboard schematic updated
The text "E93839" printed on a circuit board is not a unique model number. It is an Underwriters Laboratories (UL) file number registered to . Identifying Your Exact Board
Since "E93839" is used across various systems, check your board for these common pairings: How to identify Dell motherboard part number Output capacitors/inductors surrounding the CPU socket
Check respective pins on the 24-pin ATX connector or output inductors (coils).
[Standby Power: +5VSB] ───> [Power Button Press] ───> [Main Rails: +12V, +5V, +3.3V] ───> [CPU VCCST / VCORE] 1. Standby Power (+5VSB) Always present when the power supply is plugged in. The text "E93839" printed on a circuit board
Access to the revised schematic is crucial for technicians dealing with power delivery failures, dead boards, or component degradation. This guide breaks down the updated schematic architecture, critical voltage rails, and systematic troubleshooting steps. Technical Specifications Overview
Locate the Super I/O chip (often an IT8728F or NCT6776D variant) on your schematic. Measure the voltage at the VCC pin. It must read exactly 3.3V or 5V depending on the chip specifications. If this voltage is missing, trace backward to the linear regulator or the 5VSB wire on the ATX connector. Step 2: Check the Reset Signals
Before probing individual circuits, technicians must understand the core architectural baselines dictated by different production revisions of the E93839 platform. Feature / Component Dell Revision (e.g., OptiPlex 790) HP Revision (e.g., Z240 / FXN1) Processor Generation Intel 2nd Gen Core (Sandy Bridge) Intel 6th/7th Gen Core / Xeon E3 v5/v6 Chipset Intel Q65 / Q67 Express Intel C232 / Q170 Memory Standard DDR3 SDRAM (Up to 1333 MT/s) DDR4 SDRAM (Up to 2400 MT/s) Expansion Bus PCIe Gen 2.0 PCIe Gen 3.0 Primary Video Out DisplayPort 1.2 / VGA Dual DisplayPort / USB-C (Variant Dependent) Critical Power Rails and VRM Architecture
Finding a reliable schematic for these boards is notoriously difficult through official channels like the HP Support Community .


If you already have an MXL (assuming it’s a Pista), why don’t you export from Race Studio 2 to a csv file and import that into Dashware? Lots of people already do that.
Hi Matt – my dash is only the Strada so no datalogging capabilities there…
[…] Data export – you can now export your saved sessions into the RaceCapture log file format – which can be imported right into RaceRender for easy data overlay. Our customers also successfully used Dashware – Rowan Hicks has an excellent blog post on the topic. […]
This is awesome, I just made my first Dashware video with RaceCapture/Track logs, it was awesome. I have a lot of work to do in order to get my gauges looking good, but at least I got them all hooked up. Thank you!